
Web Server - Windows Server 2008
Web Server - Windows Server 2008

Installation
To start Server Manager, click Start Menu -> All Programs -> Administrative Tools -> Server Manager. The Server Manager window opens.

1. In the Server Manager window, select Roles. The Role Summary View is displayed.

2. Click Add Roles. The Add Roles Wizard opens. Click Next to select roles to install.

3. Select Web Server (IIS). Figure 11: Select Web Server (IIS) in Add Roles Wizard

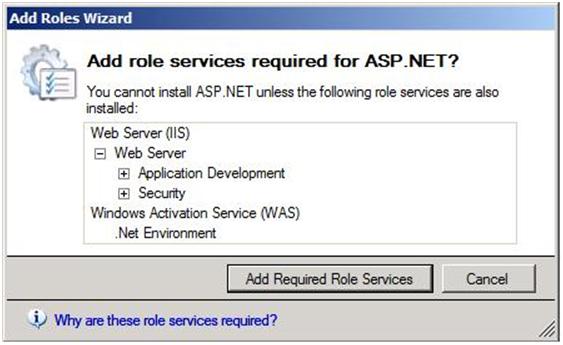
4. The Add Roles Wizard notifies you of any required dependencies; since IIS depends on the Windows Process Activation Service (WAS) feature, the following informational dialog box appears. Click Add Required Role Services to continue.
5. The Web Server is now selected for install. The Select Server Roles dialog box opens. Click Next to continue.

6. The following dialog box and information appears. Click Next to continue.

7. The Add Roles Wizard displays a list of all IIS 7.0 features available to install as shown below. Note that features comprising the default install are pre-selected.

8. To install just the IIS 7.0 default features, click the Install button, and then proceed to Step 14. If you need to install additional features, proceed to step 10.
9. For this example, we install additional IIS features. Select the check box for ASP.NET. The Wizard warns if adding an IIS feature will also cause other features to be installed.

10. Click Add Required Role Services to continue.
11. Continue selecting additional IIS Role Services features to install.

12. When you have selected all the features you require, click Next to continue.
13. The Wizard provides a summary of what will be installed.

14. Click Install to continue. The Installation Progress dialog box opens.

15. When the IIS 7.0 installation is complete, the following dialog box opens. Click Close to return to the Server Manager.

16. You can now perform a quick check to verify that IIS 7.0 is installed. Start the Windows® Internet Explorer® Web browser, and enter the address http://localhost. You should see the default IIS "Welcome" page.
Configuration


1. Then next 2 times.
2. Give a website name (like www.hanif.com)
3. Give the server IP (What you took for your server)
4. Then select the path there will be a path under wwwroot by the new folder tab.
5. Click to the allow anonymous website

6. Then give the permission about the website.
7. Then next click and that will be configured.
Web server properties
We can make any change of our website as the properties of the ftp server

1. We can limit the bandwidth and website connection by the option of performance.
2. ISAPI filters is use for add that things
3. Home directory is use change the place where we want to save our files.
4. Documents are use for what page we want to make the default page here we can keep more file as the priority.
5. Directory security use for user name and password or we can remove the password. IP address and domain restriction is use for restriction the access of the computer what we want or we can restrict group of computer in a click.
How to upload the website and check it
1. Make a webpage
2. Copy it
3. My computer> C drive > Inetpub > wwwroot
4. New folder (as we already selected)
5. Paste the website
6. Go to a browser and type the website name(like www.hanif.com)
7. Then see the website is visible to you what you made .
About Tech Soldier


No comments